How to Configure OpenVPN on a DD-WRT Router Without Breaking Streaming Video Services
For several years I've been running ASUS routers with the Merlin firmware in order to support advanced VPN configurations at the router level to ensure that my devices are all routing their traffic through VPNs by default. Protecting your internet traffic is but one of many recommendations I suggest in my Modest Privacy Protection Proposal. While configuring a VPN on router firmware that supports doing so isn't that difficult, there are two tricky issues you don't want to overlook.
- A Kill Switch - if your VPN connection dies, you don't want all of your network traffic suddenly switching over to go through your WAN (ISP) without you noticing that you are no longer protected by the VPN. You want a rule that will block your traffic instead. That way you'll immediately notice that something is wrong and investigate the VPN setup.
- Exclusion of streaming devices. If you have a device for streaming audio or video such as a Roku, Fire Stick, or "smart TV" then you'll quickly notice that many popular services like Netflix / Hulu / Amazon block VPNs because people use them to get around geographic content blocks. Thus you'll want the traffic on those devices to travel normally out through your WAN.
On the Merlin firmware it's fairly straightforward for less technical people to set these advanced rules in the GUI, but I recently purchased a Linksys router that I flashed with DD-WRT and found that it was much more challenging to replicate my normal setup. While there are many DD-WRT tutorials, the steps necessary to perform this configuration are spread across multiple tutorials and forum posts. Here's the step by step process that ended up working for me.
Prerequisites
- A DD-WRT compatible router. Flash it with the appropriate DD-WRT factory image.
- A subscription to a VPN service that supports OpenVPN. I recommend reading this guide and then using the comparison chart on the same site to inform your decision.
Enable VPN
Once you have a VPN subscription, find the service's OpenVPN configuration guide. If it's a very popular service they may even have a DD-WRT specific tutorial. Go to the Services => VPN page in your router administration panel to find the OpenVPN Client settings. Once you have everything set, click "Save" and then "Apply"
Navigate to the Status => OpenVPN page and at the top you should see "Client: CONNECTED SUCCESS"
Enable Selective Routing
If you configure "Policy Based Routing" for your OpenVPN client then it will only send traffic for matching devices through the VPN. Since I couldn't find a straightforward way to simply tell the router NOT to send traffic from specific devices through the VPN, I had to do the opposite.
The workaround I used is to set policy rules will send all traffic from devices that get assigned dynamic IPs through the VPN, which means that all you need to do to ensure a device doesn't get routed through the VPN tunnel is to assign it a static IP outside of the normal DHCP range.
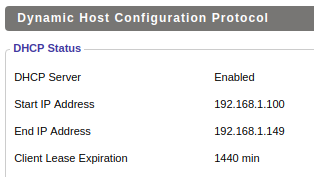
The default range of assigned addresses is 192.168.1.100 through 192.168.1.150. This range is configurable on the Setup => Basic Setup page.

You can confirm the DHCP IP range on the Status => LAN page.
We can use CIDR format as shorthand; if you need a different IP range covered then use this tool to convert to CIDR.
In the "Policy Based Routing" box on the Services => VPN page, paste:
192.168.1.100/30
192.168.1.104/29
192.168.1.112/28
192.168.1.128/28
192.168.1.144/30
192.168.1.148/31
Once you have everything set, click "Save" and then "Apply"
Set Non-VPN Devices as Static IPs
You can find the list of connected devices on the Status => LAN page. You'll want to copy the MAC address and Hostname into the Static Leases section on the Services => Services page. Assign an internal IP address to each of these devices that is higher than 192.168.1.150 but lower than 192.168.1.255.

Click "Save" and then "Apply Settings" at the bottom of the page.
Now you'll want to go back to the Status => LAN page and look in the DHCP Clients list for each of the devices for which you just created a Static Lease. Click on the trash icon on the right to delete its current lease so that it's forced to get a new one and will switch to the new static IP.
Enable Kill Switch
Finally, we want to ensure that any of the devices for which we want traffic only routed through the VPN don't accidentally have their traffic routed through the WAN if the VPN fails for any reason. While there are several tutorials for kill switch firewalls available, they tend to be oversimplified and block ALL traffic through the WAN, which would also block our streaming devices that we want to use the WAN.
Navigate to Administration => Commands and paste in the following commands:
WAN_IF=$(/usr/sbin/nvram get wan_iface)
iptables -I FORWARD -s 192.168.1.100/30,192.168.1.104/29,192.168.1.112/28,192.168.1.128/28,192.168.1.144/30,192.168.1.148/31,192.168.1.150/32 -o $WAN_IF -j DROP

Make sure the above is on two separate lines in the text box, then click "Save Firewall."
Note: when you save the firewall your router will reboot and you'll lose your Wi-Fi connection for several minutes.
That's It!
Now that you have everything configured, you may wish to save yourself some time in the future in case you ever need to hard reset the router or replace it due to hardware failure. You can make a backup of your saved configuration by going to Administration => Backup.