How to Solo Mine on Bitcoin’s Testnet

I’m a Bitcoin engineer, so I often need to test new code but I don’t want to risk losing valuable bitcoins in case there is a bug. Thankfully, the Bitcoin testnet was created specifically for this purpose. As a side project I decided to buy a secondhand Bitcoin ASIC, an Antminer S5, and give a shot at solo mining on testnet so that I could generate some coins. Unlike on mainnet, which has so much mining competition that you’ll probably never find a block, the difficulty on testnet is low enough that solo mining is worthwhile. The following instructions should work for any ASIC that uses cgminer, though from what I’ve read the configuration for bfgminer is nearly identical.
The two major components you need in order to solo mine are:
- A Bitcoin node
- Bitcoin hashing hardware (Application Specific Integrated Circuit)
First you’ll need to get a full node running. If you’re unfamiliar with the process, there are some great instructions here. Once you have the node software installed, you’ll need to make a few extra config changes to the bitcoin.conf file before running the node:
testnet=1
# IP Address of your ASIC
rpcallowip=192.168.1.14
# set these to something unique and random!
rpcuser=aR4ND0mU53R
rpcpassword=aR4ND0mP455W0Rd
The important bits are to tell your node to use the testnet blockchain and network, and then to set up the RPC authentication so that your miner can connect to your node to mine blocks. Once you have the node config saved, you should (re)start your node. Next you’ll need to configure your miner. On your mining machine, find the cgminer or bfgminer config file (/config/cgminer.conf on Antminer hardware) and set the following:
“user” : “aR4ND0mU53R”,
“pass” : “aR4ND0mP455W0Rd”,
“btc-address” : “mqLecUaXHNBe8WEq4SxjREvQD3P66BB6tP”,
“url” : “http://192.168.1.13:18332"
“User” and “pass” should match your node’s RPC credentials. “btc-address” should be the address that you own to which you want the coinbase transactions to pay out. Note that you should probably set the address to be a P2PKH and not a P2SH address — I had problems trying to use the latter. And the IP address of the URL should be the IP of your testnet Bitcoin node. Once your mining software is configured, (re)start the miner. On Antminer hardware, you can use the command “/etc/init.d/cgminer.sh restart”
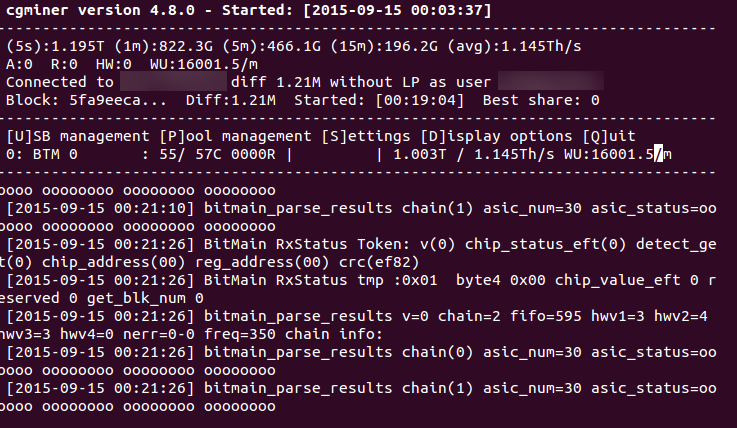
To ensure that you’re actually mining, you can check the cgminer dashboard (“screen -r cgminer” on Antminer)
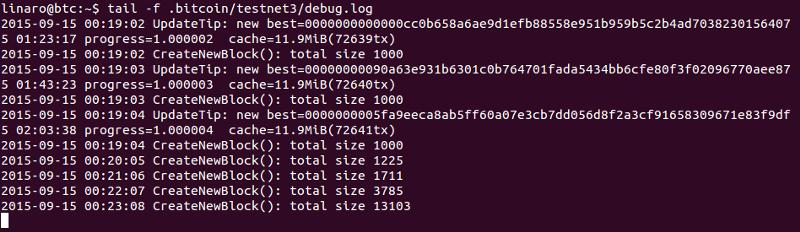
You can also check your Bitcoin node’s debug log to see that it is receiving requests for block templates:
We run a testnet version of BitGo at https://test.bitgo.com/ — if you’re a developer who wants to build an app with our service and you need testnet coins, send me a message!