How to Protect Your Home Network with a Gigabit VPN

I've been using virtual private networks (VPNs) to help protect my privacy for several years. But as I found myself collecting more and more networked devices in my home, it became more of a pain to ensure that each device was always running a VPN client.
As a result, I started looking into consolidating my VPN usage so that the VPN client would run in a single location: at my home network router.
Unfortunately, after testing several routers it became clear that the average retail Wi-Fi routing hardware does not have a sufficiently powerful CPU that can to handle encrypting and decrypting high volumes of OpenVPN traffic. My conference call quality and file upload/download speeds were suffering. Thus, it was time for a new project!
Project Goals
- A dedicated device that you plug into your home network.
- The device should not be a bottleneck for your network due to hardware limitations.
- Device should run a VPN tunnel that automatically routes all traffic your home network through it.
- It should be possible to configure specific devices to NOT have their traffic routed through the tunnel.
A Cheaper, Simpler Option
A few months after publishing this article, I came across a new router that gets most of the way toward achieving the goals of this project. For only $100 you can buy the Flint (GL-AX1800) and protect all your home network traffic with a WireGuard VPN. The caveats:
- Your speeds will be limited to 500 Mbps due to the weaker ARM CPU.
- The selective routing configurability is more limited; the best it can do is allow you to set up a "guest network" that isn't routed over the VPN and then you must configure your non-VPN device to use that Wi-Fi network.
If you're willing to take the more complicated path for better performance, continue on!
Prerequisites
While I have endeavored to make this guide as easy and straightforward as possible, it's not for everyone. You should be prepared to meet the following criteria:
- $300 - $500 in hardware costs
- a high speed internet service plan
- comfort with Linux command line usage
- a 802.11ax (Wi-Fi 6) compatible Wi-Fi access point
- a full day of time to set up and troubleshoot problems
Definitely give this guide a full read-through before jumping into anything or purchasing hardware. I spent over a week tinkering with configurations and suffering frustrating dead ends before I managed to get everything working exactly how I wanted. Hopefully my pain will be your gain so that you can avoid the footguns I triggered.
The Hunt for Hardware
A year ago I covered the variety of software and hardware options available for home VPNs:

My conclusion from that research was that I needed a sufficiently powerful dedicated mini PC to act as a WireGuard tunnel endpoint so that its CPU would not be a bottleneck for encrypting and decrypting network traffic. ProtectLi seemed to fit the bill best.
So which of the dozen ProtectLi Vault devices does one actually need in order to max out the capability of a gigabit ISP? ProtectLi's documentation has performance tables for each device and the throughput you can expect with different VPN protocols such as IPSec / OpenVPN / WireGuard. You can find the WireGuard metrics here.
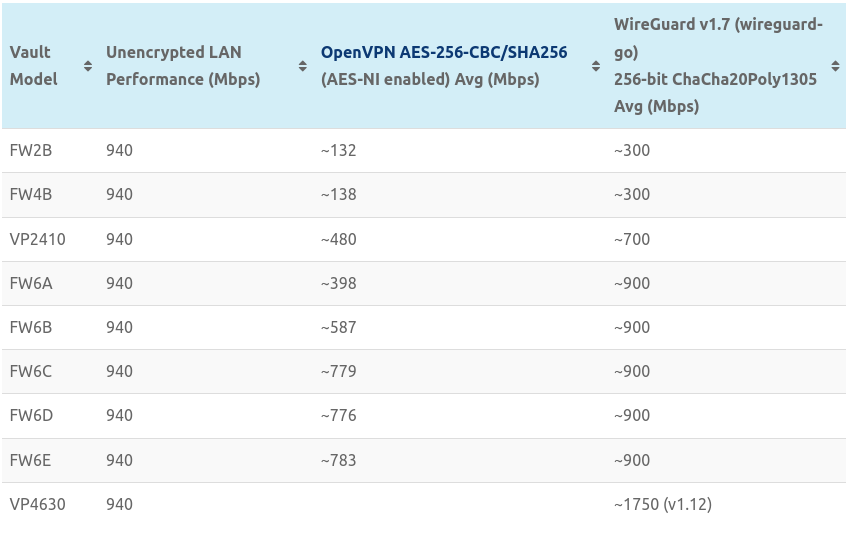
Thus it looks like the best bang for our buck will be the FW6A which sells for $370 at time of writing. The FW6 is based on a 6 network port design that leverages a low power, but versatile Intel Celeron 3867U CPU. Note that our performance will be even higher than 900 Mbps because of additional optimizations we'll apply later.
We need to decide on some of the other specs for the Vault. We can see from their performance article that the test was performed on:
| Device | FW6A |
| BIOS | coreboot |
| OS | OPNsense |
| CPU | Intel Celeron |
| RAM | 8GB |
| Disk | 120GB |
You could go a bit lower on the RAM (2GB should suffice) and disk (20 GB is plenty) but it wouldn't save you much money. At time of writing this brings the total cost to $475.
But wait! It turns out that ProtectLi is selling rebranded Chinese hardware! If you look for the "TOPTON Fanless Mini Router" on AliExpress you can find a similar device for $275 at time of writing. If your ISP offers multi-gigabit speeds you can even find devices that support 2.5 gigabit ethernet.
Which one should you go with? I think it's basically a question of if you want to save yourself an hour or so of following this guide to install and configure OPNsense on the hardware device.
Decision Point: What Will Run Your Wi-Fi?
The setup I've architected has you using 3 separate pieces of hardware for your home network:
- Modem
- Router
- Wi-Fi Access Point
Note: if you are currently using a combination modem / router / Wi-Fi device (as are commonly provided by ISPs) then you will need to disable the Wi-Fi on the modem and use a separate device for providing Wi-Fi access. That's because the most important part of this process involves setting up much more robust routing hardware that must (logically) sit "between" the two other functions for your home network.
It's possible to simplify this to only a Modem and combination Router/Wi-Fi device IF you buy the appropriate hardware and install a compatible operating system. You can check out ProtectLi's documentation on Wi-Fi compatibility to learn more. Long story short, the compatibility for their fast Wi-Fi module may change in the future but at time of writing:
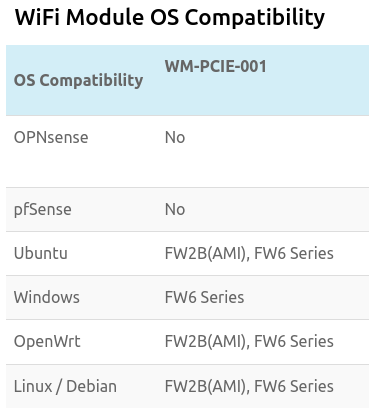
So you'd want to run either Linux or OpenWRT on the device if you want it to act as your Wi-Fi access point, which will involve following a different set of instructions (OpenWRT's are here) to enable your VPN tunnel. Personally I've chosen to use the 3 device setup for a couple of reasons:
- My research last year settled upon OPNsense being the best routing software.
- Using a dedicated device for each function of your home network allows for specialization. I expect the Wi-Fi range & signal on ProtectLi / TOPTON hardware will be mediocre. If you're trying to cover a very large property then you'll likely want something with many more antennae or even a solution that supports running multiple Wi-Fi access points that combine to act as a mesh network.
Before you order your new routing hardware you'll want to check one thing on your existing (standalone) Wi-Fi router. Make sure you can find a setting on it to disable the routing (NAT) functionality. This will be different for each brand of hardware, and some cheaper / ISP supplied devices may not even support it. Some devices may call it "access point mode" or "bridge mode."
Once you receive your router hardware, we can proceed to the configuration.
OPNsense Initialization
Once you receive your ProtectLi / TOPTON hardware, power it on and connect a laptop or desktop to it via an ethernet cable. The cable should be plugged into the 2nd port on the device; on mine it's labeled LAN2.
If you bought hardware that doesn't have the operating system installed on it, follow these instructions to install OPNsense.
Then you should be able to visit https://192.168.1.1 in a web browser, log in with username "root" and password "opnsense" and step through the setup wizard for OPNsense. Just click through all the default options; the only thing I changed was the root password.
The rest of this guide will go into a lot of depth regarding various OPNsense settings, though if you want to save a lot of time, I'd suggest that you go to System -> Configuration -> Backups and import this configuration file. Otherwise, there's a decent chance that if you go through the completely manual configuration process, you'll miss one or more settings and it will take you a long time to hunt down what's wrong. Note that importing this file will reset the admin username and password back to the defaults listed above.
Home Network Hardware Architecture
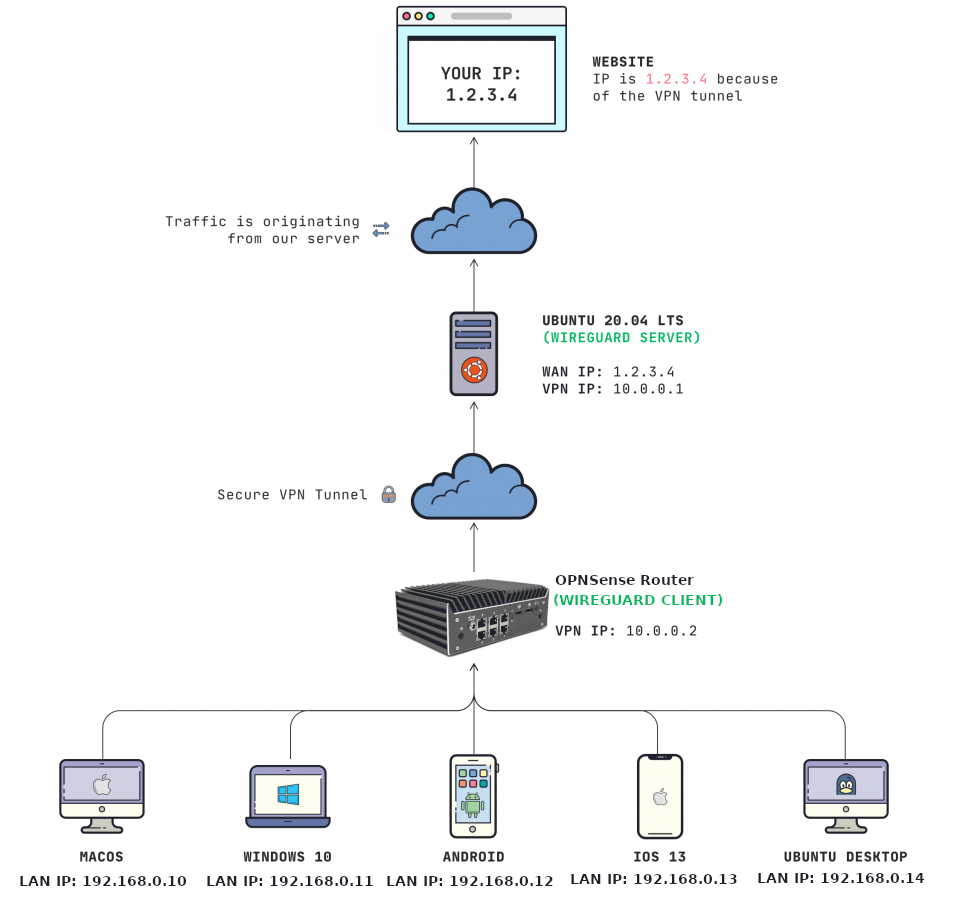
If you'll excuse my crude diagramming skills, we're looking to create a hardware architecture as follows: Internet (ISP) ➡️ Modem ➡️ Router ➡️ Wi-Fi Access Point ➡️ Your Devices.
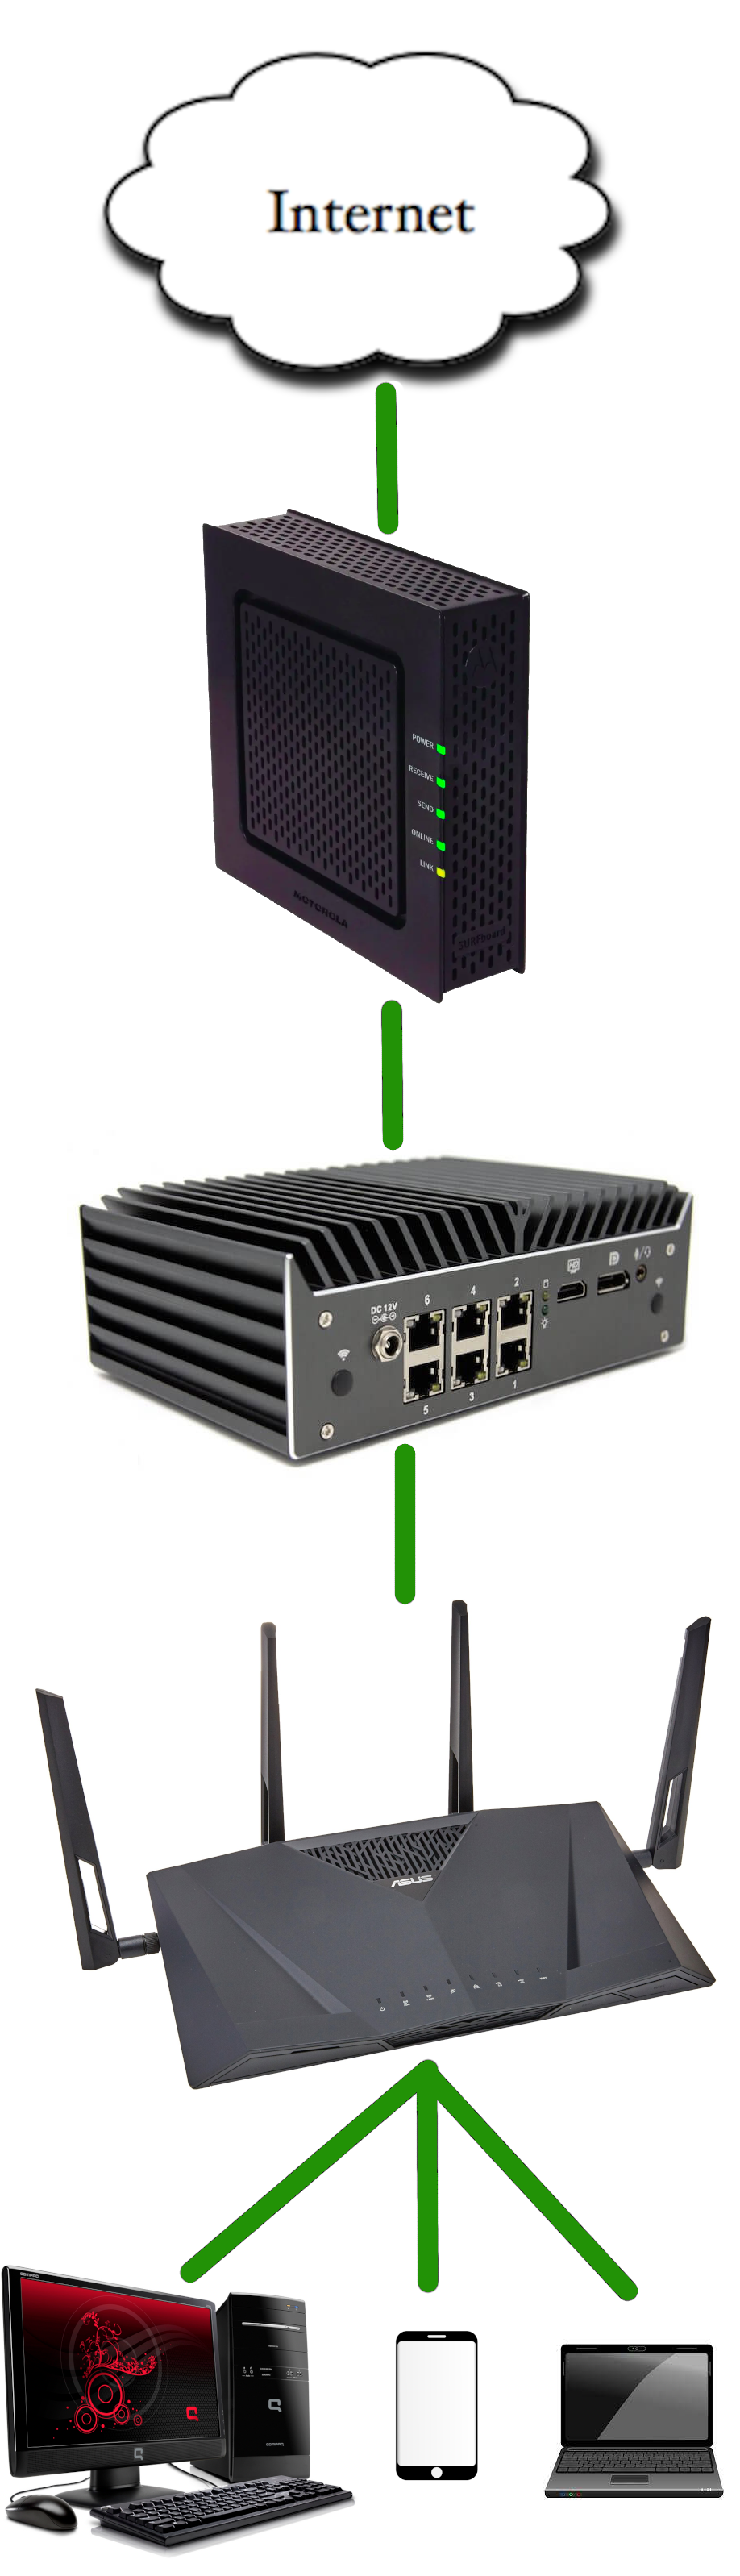
For the network traffic flow what we're trying to achieve is pretty similar, except once traffic reaches your router, it enters into a VPN tunnel, the data flows through the modem and then your ISP while inside the tunnel, then it pops out of the tunnel at a server endpoint before finally being routed to the wider Internet.
Home Network Hardware Configuration
Configuring networking hardware can be perilous. By which I mean, if you save a particularly bad network configuration, you can sometimes not only break your entire network but you can even make it so that you can no longer access the device itself to undo your change, and the only option becomes to do a factory reset of the device. As a safety precaution, I suggest making a backup of each device's configuration before proceeding. If the device supports backups, you'll likely find the option somewhere in the "system" or "administration" areas of its web interface.
I recommend completing the following steps in order, without skipping around.
- For initial physical setup, go ahead and plug all the devices together with ethernet cables as shown above. The ethernet cable going from the modem should plug into the WAN port of your new ProtectLi/TOPTON router, which ought to be port 0 (or the lowest numbered port.) Then the cable from the router should come out of the LAN port (the WAN port + 1) and plug into the WAN port on the Wi-Fi access point. Once the devices are all connected, power them up. Check from a laptop or phone that's on your Wi-Fi that you have Internet access. If you don't, it's probably because the ethernet cables are connected incorrectly.
- If your endpoint devices have internet access, the next step is to fix the "double NAT problem" by disabling the routing (Network Address Translation) functionality on your Wi-Fi device. The way you accomplish this varies from router to router; for ASUS routers you go to the "Operation Mode" settings and switch is from "Wireless Router" to "Access Point" mode, per the instructions you can find here. Now the device will reboot and from here on it simply acts as a pass-through wireless access point. Check again on an endpoint device (desktop / laptop / phone) that it can still access the Internet before proceeding. Note: going forward, in order to access your Wi-Fi Access Point's web dashboard you'll have to visit a different LAN IP address, as it will now have its IP address assigned by OPNsense. You can find the new IP address in the DHCP Leases section of OPNsense.
- Now you should be able to visit https://192.168.1.1 in a browser and see the OPNsense web interface. Next we'll start building the VPN tunnel.
OPNsense Performance Enhancements
The first time I completed my network setup, I ran a bandwidth test and was only seeing ~15 Mbps while I was expecting more like 900 Mbps.
If you aren't running OPNsense 23.1 or later (released on Jan 26, 2023) then do not install the wireguard plugin like all of the standard guides tell you - it's quite slow! To install the kernel module on older versions you simply need to SSH or access the console of OPNsense by plugging it into a keyboard and monitor and install the package with the command:
pkg install wireguard-kmod
Once installed, simply reboot OPNsense and you’ll now be using the WireGuard kernel module. Note: the wireguard-go service will show as stopped since the go implementation isn’t being used.
If you are running OPNsense 23.1 or later, just make sure that you install the "os-wireguard" plugin and NOT the "os-wireguard-go" plugin. The go version is far slower.
But wait, there's more! Go to System ➡️ Settings ➡️ Tunables and edit (or add) the following values:
hw.ibrs_disable = 1
kern.ipc.maxsockbuf = 614400000
kern.random.fortuna.minpoolsize = 128
net.inet.tcp.abc_l_var = 52
net.inet.tcp.minmss = 536
net.inet.tcp.mssdflt = 1240
net.inet.tcp.soreceive_stream = 1
net.isr.bindthreads = 1
net.isr.defaultqlimit = 2048
net.isr.dispatch = deferred
net.isr.maxthreads = -1
net.pf.source_nodes_hashsize = 1048576
These values are optimized to handle gigabit and higher speeds. If your ISP connection or VPN server is significantly slower than a gigabit then you won't notice much difference.
VPN Server Considerations
A VPN tunnel is called that because it really is a tunnel: traffic goes into one end, travels through the tunnel (during which it's protected from outside interference) and then eventually it exits from the other end of the tunnel.

Thus far in this guide we have focused on the end of your VPN tunnel that is at your home network. Now you must decide where you want the other endpoint of the tunnel to be. That endpoint must be a machine that also runs WireGuard VPN software. So you'll need to decide if you want your VPN endpoint to be:
- A commercial VPN provider
- A machine that you manage yourself
If you have come this far, I highly encourage you to go to the effort of running your own VPN endpoint. The benefits of doing so are enormous:
- You won't be sharing the resources of the endpoint machine with an unknown number of other users - you should have a more consistent experience.
- You're far less likely to run into extra CAPTCHAs and service blocks because your IP address won't be on the commonly blacklisted "commercial VPN" lists. This will again improve your general Internet user experience.
- There's less of a trust issue regarding third parties keeping logs of your traffic that they will leak or hand over to authorities if coerced to do so. Yes, it's still possible for this machine to be compromised if it's hosted in a data center you don't control, but I'd argue it's far less of a honeypot / target than commercial VPNs.
- In general you can have a stronger privacy assurance because you control the endpoint.
- In my experience, commercial ISPs tend to have less reliable endpoints that you have to switch between when they have operational issues, which is a huge pain if the only way you can do so is by updating your router's WireGuard configuration.
In summary, I think it's well worth the one-time setup cost to spend a couple hours configuring your own VPN endpoint. It should give you a better user experience over the long run with lower ongoing maintenance requirements.
Considerations for choosing a cheap VPS that will meet your needs:
- You only really need one moderately powerful CPU. It's hard to give specific CPU specs advise as there aren't many performance benchmarks available, but it seems like any desktop class AMD or Intel CPU produced in the past few years should suffice.
- Machine needs minimal RAM and disk space since it's just sending and receiving traffic without storing anything. Mine only has 1 GB of RAM and 20 GB of disk space.
- Geographic location is probably the most important factor - you likely want the machine to be on the same continent as you for lower latency and higher bandwidth. Of course, if you prefer stronger privacy at the expense of those attributes, the machine can be hosted effectively anywhere.
You can set up a sufficiently powerful endpoint server for $5-$10 a month. I'd suggest using serverhunter.com to search for 10 gigabit hosting providers with data centers in your country. Why 10 gigabit? Because every time I tested a VPS that claimed to be a gigabit connection, I'd only see speeds of ~100 megabits per second. From what I could tell, most of the smaller hosting providers that market themselves as "affordable hosting" tend to fall flat when it comes to bandwidth. Sticking to larger hosting providers that promise 10+ Gbps will yield better results; there are plenty to choose from for under $10 a month.
Testing Your VPN Server Performance
Before you spend the time setting up and configuring WireGuard on the VPS you create, you should first ensure that it's fast enough to handle traffic that saturates your home internet connection. Basically, we want to verify that the VPS won't be a bottleneck.
iperf3 is a great tool for testing bandwidth. Install it on both your VPS and your laptop / a machine that's wired into your home network:
sudo apt install iperf3
If your VPS is already running a firewall (you can check by running "ufw status") then you should allow traffic for this test:
ufw allow from 0.0.0.0/0 to 0.0.0.0/0 port 5201
Then run it as a server on your VPS via:
iperf3 -s
Next, from a laptop or desktop that's wired into your home network (not over wi-fi because your wi-fi protocol / frequency may be a bottlneck) run:
iperf3 -R -c VPS_IP_ADDRESS -P 10 -t 60
And you'll see the performance test running:
[ ID] Interval           Transfer     Bitrate         Retr
[ 17]   0.00-60.00  sec  68.7 MBytes  9.61 Mbits/sec   95   sender
[ 17]   0.00-60.07  sec  67.6 MBytes  9.43 Mbits/sec        receiver
[ 19]   0.00-60.00  sec  74.4 MBytes  10.4 Mbits/sec  159   sender
[ 19]   0.00-60.07  sec  72.7 MBytes  10.1 Mbits/sec        receiver
[ 21]   0.00-60.00  sec  63.1 MBytes  8.82 Mbits/sec  150   sender
[ 21]   0.00-60.07  sec  61.9 MBytes  8.64 Mbits/sec        receiver
[ 23]   0.00-60.00  sec  74.5 MBytes  10.4 Mbits/sec  114   sender
[ 23]   0.00-60.07  sec  73.3 MBytes  10.2 Mbits/sec        receiver
[SUM]   0.00-60.00  sec   856 MBytes   120 Mbits/sec  1245  sender
[SUM]   0.00-60.07  sec   842 MBytes   118 Mbits/sec        receiver
The "SUM" line is the one we care about. Here we can see the first VPS provider I tried setting up was limited to 120 Mbps, only 12% of what we're looking for. To be clear, the above iperf3 command will test your DOWNLOAD bandwidth (sending data from your VPS to your home network) while if you want to test your UPLOAD bandwidth, run the same command without the -R parameter.
Finally, clean up your firewall rule if you had to create one!
$ ufw status numbered

Status: active

     To                         Action      From
     --                         ------      ----
[ 1] 22                         ALLOW IN    Anywhere
[ 2] 51820/udp                  ALLOW IN    Anywhere
[ 3] OpenSSH                    ALLOW IN    Anywhere
[ 4] Anywhere on eth0           ALLOW FWD   Anywhere on wg0
[ 5] 5201                       ALLOW IN    Anywhere
[ 6] 22 (v6)                    ALLOW IN    Anywhere (v6)
[ 7] 51820/udp (v6)             ALLOW IN    Anywhere (v6)
[ 8] OpenSSH (v6)               ALLOW IN    Anywhere (v6)
[ 9] Anywhere (v6) on eth0      ALLOW FWD   Anywhere (v6) on wg0

$ ufw delete 5
Deleting:
 allow 5201
Proceed with operation (y|n)? y
Rule deleted
Building Your VPN Server
Once you've got a VPS running that will meet your bandwidth requirements, it's time to start configuring the VPN tunnel. If you're a fan of OpenBSD, check out this guide:

If you're more familiar with Ubuntu or Debian, check out this guide:
 Jamon Camisso
With the above guides you can stop once you get to instructions for configuring the WireGuard peer / client, as we'll be doing that in OPNsense. Make sure you keep a copy of the following info which you'll need to configure the WireGuard client in OPNsense:
- Public IP address of your VPS
- WireGuard public key
- The tunnel's private IP address you set in the WireGuard config file
At this point your /etc/wireguard/wg0.conf file should look something like this:
[Interface]
Address = 10.8.0.0/24
SaveConfig = true
ListenPort = 51820
PrivateKey = [REDACTED]

PostUp = ufw route allow in on wg0 out on eth0
PostUp = iptables -t nat -A POSTROUTING -o eth0 -j MASQUERADE
PostUp = iptables -A FORWARD -i %i -j ACCEPT
PostUp = iptables -A FORWARD -o %i -j ACCEPT
PreDown = ufw route delete allow in on wg0 out on eth0
PreDown = iptables -t nat -D POSTROUTING -o eth0 -j MASQUERADE
PreDown = iptables -D FORWARD -i %i -j ACCEPT
PreDown = iptables -D FORWARD -o %i -j ACCEPT
OPNsense Wireguard Configuration
A word of warning about most WireGuard guides: they tend to be focused on the most common use case of running a VPN tunnel INTO your home network so that you can securely reach machines at home while you are away. Thus they are the inverse of what this guide seeks to achieve: routing all of your home network traffic OUT of the tunnel so that it pops out onto the Internet from a VPS you're running in a data center.
While the official OPNsense WireGuard documentation can be found here, I recommend this more user-friendly step-by-step guide to get your basic tunnel configured correctly. Follow the guide until you reach the section titled "WireGuard Peer Configuration."
Reminder: you can save a lot of time by importing my example config file to bypass much of the tedious setup.
Once you have OPNsense configured you may notice that the WireGuard tunnel connects but does not actually allow traffic. This is because you need to configure the WireGuard VPS now to accept traffic from OPNsense. So you need to:
- SSH back to your VPS
- stop the wireguard service (sudo systemctl stop wg-quick@wg0.service)
- Add these 3 lines to the bottom of /etc/wireguard/wg0.conf, replacing OPNSENSE_WG_PUBKEY with the actual public key and the tunnel IP address range with whatever you've settled upon.
- start the wireguard service (sudo systemctl start wg-quick@wg0.service)
[Peer]
PublicKey = OPNSENSE_WG_PUBKEY
AllowedIPs = 10.8.0.2/32
Next you should follow the guide for configuring the router to send your home network traffic through the VPN tunnel:

NOTE: I was scratching my head for a while when configuring my WireGuard tunnel endpoints because the tunnel wasn't connecting and it wasn't creating the "wg1" interface for me to configure as per the guide. It turned out that if you don't have EVERY SINGLE field filled in with a value on the local and endpoint configuration, the tunnel will fail to start. In my case this was because I didn't set a "Keepalive Interval" on the endpoint. I ended up setting it to 25 after seeing several guides recommend this as a best practice to prevent dropped connections.
NOTE 2: Make sure you leave the "shared secret" field on the endpoint config empty!
NOTE 3: this guide recommends clicking "advanced mode" when editing your local endpoint and setting the MTU to 1420 for optimal performance. Your mileage may vary when it comes to MTU values; more on that later.
NOTE 4: It seems it's actually important that the tunnel be active when you're configuring the gateway to ensure that internal network traffic gets pushed through the tunnel, otherwise trying to save the gateway will give you an error about the target IP address of the VPN tunnel not existing.
NOTE 5: make sure you "save" and "apply" after every rule change; I forgot to do this several times and it took me a long time to figure out that my rules had been lost!
DNS Leak Fix
After everything is up and running, visit dnsleaktest.com to see if you are leaking domain name lookups outside of your tunnel. If you see it using DNS servers that are owned by your ISP, you need to change your DNS configuration!
There are a variety of options noted in the Selective Routing Guide, but after trying several I think the easiest is the following:
- In System ➡️ Settings ➡️ General I set two DNS servers (9.9.9.9 and 1.1.1.1) and set them to each use the WireGuard gateway.
- In Services ➡️ Unbound DNS ➡️ Query Forwarding I checked "Use System Nameservers" and clicked Apply.
Debugging Failures, Troubleshooting Notes
Trying to debug issues can be tricky. I got all the way through these guides, flipped the wireguard service to "on," saw it connect the tunnel and perform a handshake, but then realized no traffic was flowing through the tunnel and I had effectively killed my home network's access to the internet.
I tried to ping a few servers with the tunnel enabled and watched my firewall logs (tail -f /var/log/ufw.log). I could see the firewall allowing the traffic out, but I wasn't getting any responses back. It took a lot of tinkering and further research to discover the multiple configuration issues I had that was preventing traffic from consistently flowing through the tunnel.
Also, "traceroute" is your friend if traffic isn't flowing. It will at least show you where the routing is failing. For example, this showed me that something was wrong at my router level and it wasn't properly sending traffic through the tunnel:
traceroute 8.8.8.8
traceroute to 8.8.8.8 (8.8.8.8), 30 hops max, 60 byte packets
 1  192.168.1.1 (192.168.1.1)  3.399 ms  3.386 ms  3.375 ms
 2  * * *
 3  * * *
 4  * * *
 5  * * *
If you're stuck trying to debug traffic failures, check out this post on several different ways to get logging info.
With further reading I realized that WireGuard's "AllowedIPs" config acts not only as a kind of "firewall" rule but also as a routing rule. This is why you need to follow the instructions from the "Configuring a Peer to Route All Traffic Over the Tunnel" section of this guide on your VPS. At one point I was too gung-ho and set wireguard's "AllowedIPs" to 0.0.0.0/0 on my VPS (which was not at all necessary) without adding the extra rules and managed to lock myself out of being able to SSH to the VPS!
Another issue I had to deal with after the accidental lock-out was that I couldn't restart wireguard after fixing the config via the VPS' emergency web console. It was throwing an error:
wg-quick[7829]: wg-quick: `wg0' already exists
systemd[1]: wg-quick@wg0.service: Main process exited, code=exited, status=1/FAILURE
I realized that I couldn't even "kill -9" the old process and my previously logged in session was still running and somehow holding onto it from when I applied the bad config. The only way I was able to resolve it was to reboot the entire machine.
Yet another thing I learned the hard way was not to edit any of the PostUp or PreDown rules while the wireguard service was running. If you do that and then try to restart the service, it will fail while trying to delete the (non-existent) PreDown rules.
wg-quick[1194]: [#] ip route delete table 200 default via [REDACTED]
wg-quick[1262]: RTNETLINK answers: No such process
systemd[1]: wg-quick@wg0.service: Control process exited, code=exited, status=2/INVALIDARGUMENT
After resolving the above issues, I was still stuck. When I enabled Wireguard on OPNsense, the status tab claimed it was sending a trickle of data but not receiving anything. tcpdump on my VPS showed 0 traffic on the wg0 interface and only a trickle on the ethernet interface, presumably just keepalive requests to maintain the tunnel. When I tried to ping any public Internet IP from inside my network, it would time out. I could see in the OPNsense Firewall Live View that my network requests were being forwarded to the Wireguard interface, but couldn't tell if they were being dropped after that. I checked /var/log/ufw.log on the VPS to ensure that it wasn't blocking traffic, and I saw no entries with IP addresses that belonged to my machines.
Eventually I realized that my tunnel was sending traffic to connect, but it was never establishing a full connection that would send data back through the tunnel. After a ton of additional reading I finally realized I had screwed up and copied a key into the "shared secret" field of the endpoint config, which unintentionally added a second factor of authentication that I didn't want!
Debugging Random Timeouts
This final issue took me nearly a week to resolve. After having everything set up, I was getting great speeds... except for around 10% of web sites that simply would not load AT ALL. If you're having that issue, run this command against a web site that won't load. If you see a similar output where the connection hangs during the SSL handshake, the solution is quite simple.
$ wget -d -v https://duckduckgo.com
Setting --verbose (verbose) to 1
DEBUG output created by Wget 1.21.2 on linux-gnu.

URI encoding = ‘UTF-8’
Converted file name 'index.html' (UTF-8) -> 'index.html' (UTF-8)
--2023-01-27 11:04:27--  https://duckduckgo.com/
Resolving duckduckgo.com (duckduckgo.com)... 52.149.246.39
Caching duckduckgo.com => 52.149.246.39
Connecting to duckduckgo.com (duckduckgo.com)|52.149.246.39|:443... connected.
Created socket 3.
Releasing 0x000055e7a41d10b0 (new refcount 1).
Initiating SSL handshake.
The solution is to set the MSS value on the WireGuard interface you create in OPNsense to match the MTU value. I set 1420 for both. Why does this value need to be set? It's because there is overhead in the tunneling protocol thus we must "clamp" the tunnel packets into smaller chunks to fit inside the link packet. This was the most frustrating part of my month-long project because literally 0 of the guides I came across ever mentioned the possibility of needing to set the MSS value.
Wireguard Server Config File
After all is said and done, your VPS' /etc/wireguard/wg0.conf should look like:
[Interface]
Address = 10.8.0.0/24
SaveConfig = true
ListenPort = 51820
PrivateKey = [REDACTED]

PostUp = ufw route allow in on wg0 out on eth0
PostUp = iptables -t nat -A POSTROUTING -o eth0 -j MASQUERADE
PostUp = iptables -A FORWARD -i %i -j ACCEPT
PostUp = iptables -A FORWARD -o %i -j ACCEPT
PreDown = ufw route delete allow in on wg0 out on eth0
PreDown = iptables -t nat -D POSTROUTING -o eth0 -j MASQUERADE
PreDown = iptables -D FORWARD -i %i -j ACCEPT
PreDown = iptables -D FORWARD -o %i -j ACCEPT

[Peer]
PublicKey = [REDACTED]
AllowedIPs = 10.8.0.2/32
Selective Routing Configuration
Depending on what services you use, you may need to instruct your router to send traffic from specific devices directly to your ISP and bypass your VPN tunnel so that they don't get blocked due to not coming from a residential IP address.
The most common need for this is if you have TVs that use popular streaming services. They tend to ban all known commercial VPN IP addresses and data center IP addresses to prevent people from bypassing geographic restrictions for accessing content.
Note that selective routing is another reason why it's important to disable routing on your Wi-Fi device. If you don't do that, then OPNSense will only see all of your home network traffic as coming from a single device (the Wi-Fi access point) and thus you won't be able to selectively route traffic from specific devices outside of the VPN tunnel.
What I recommend is you decide which devices can't go through the tunnel (such as your TV) and go into the DCHP Leases page to set them to have low addresses in your local subnet range. Then use this CIDR calculator tool to figure out how to compactly describe the rest of the IP range that your other devices will be assigned. For example, the sample OPNsense config file provided in this guide reserves LAN IP range 192.168.1.2 through 192.168.1.102 for clients that will NOT have their traffic routed through the tunnel. I set the DCHP lease logic to only assign IP addresses above 192.168.1.102, so any client I want to NOT be routed through the tunnel I manually assign a static IP lower than that.
IP Range for Wireguard Routed Clients: 192.168.1.103 to 192.168.1.255
CIDR Notation:
   192.168.1.103/32
   192.168.1.104/29
   192.168.1.112/28
   192.168.1.128/25
Finally, go back to your "Firewall Aliases" configuration and find the one that describes the machines for which you wish to route their traffic through the tunnel. Paste each of the CIDR notation values into the "Content" field and save the alias. Then apply the change.
Configuring a Kill Switch
I do recommend following this guide to set a kill switch so that all traffic will stop being routed if the WireGuard tunnel goes down. Otherwise, if your VPN endpoint goes offline for any reason, you probably won't notice for a while and you'll be browsing without the VPN's protection until you do. The kill switch ensures that you are immediately alerted to any problems with the VPN.
MTU Optimization
Many of the guides I came across recommended setting the MTU to 1420. But then, after I had everything set up, I noticed I was seeing a lot of timeouts trying to connect to various sites. After searching through forums, I saw most folks recommended lowering the MTU because you can end up creating "dead zones" due to some fairly technical reasons. It turns out that your optimal MTU really depends on your setup.
Thus, if you get through this entire guide and still want to experiment with squeezing a little more performance out of your setup because it's not saturating your home internet connection, check out the WireGuard MTU Finder project.

Maintenance / Caveats
The downside to this more complex home network architecture is that there are now more potential points of failure. Things that could go wrong include:
- Your VPS endpoint crashes / gets shutdown / has networking failures
- You could blow past your VPS bandwidth cap and get cut off or charged overages
- Your modem freezes / crashes / loses power
- Your micropc router freezes / crashes / loses power
- Your Wi-Fi access point freezes / crashes / loses power
You could consider buying an uninterruptible power supply that you plug your modem, router, and Wi-Fi devices into to prevent crashes due to power loss.
I'd also recommend making a (secure) backup of your VPS' config file at /etc/wireguard/wg0.conf so that in a worst-case disaster recovery scenario you don't have to reconfigure OPNsense with new public keys.
Problems? Let Me Know!
While I've had a few people review this guide, it has not been highly tested and likely has room for improvement. If you find any problems with this guide, please give me a heads up via this contact form.
Source Material
The info in this post was cobbled together from the following guides:
- https://www.digitalocean.com/community/tutorials/how-to-set-up-wireguard-on-ubuntu-22-04
- https://www.wundertech.net/how-to-set-up-wireguard-in-opnsense/
- https://docs.opnsense.org/manual/how-tos/wireguard-selective-routing.html
- https://dev.to/tangramvision/what-they-don-t-tell-you-about-setting-up-a-wireguard-vpn-1h2g
- https://homenetworkguy.com/how-to/configure-wireguard-opnsense/
- https://gist.github.com/morningreis/eeda36e8bb07dcb750d77e9a744776e8
- https://forum.opnsense.org/index.php?topic=11737.0
- https://www.cyberciti.biz/faq/how-to-set-up-wireguard-firewall-rules-in-linux/
- https://www.procustodibus.com/blog/2020/12/wireguard-site-to-site-config/
- https://www.reddit.com/r/OPNsenseFirewall/comments/woaenn/slow_wireguard_performance/
- https://fingerlessgloves.me/2021/03/31/hello-wireguard-kmod-on-opnsense/
- https://binaryimpulse.com/2022/11/opnsense-performance-tuning-for-multi-gigabit-internet/
- https://forum.opnsense.org/index.php?topic=25365.0